Thoracic Mobility for the Desk Athlete: Unlock Your Overhead Position

The ability to fully reach your arms overhead is a mobility must have in weightlifting, crossfit, and everyday function. The main components to expressing full overhead mobility include: 

  1. Shoulder capsule mobility

  2. Lat flexibility

  3. Thoracic mobility 

The thoracic spine is the base for overhead mobility. It is also what people mean when they talk about having better posture. You can visualize its importance by first slouching and attempting to raise your arms overhead. Take note of where your fingers point. With your arms overhead, now sit up straight and note again where your fingers point. 

Given the rise of work from home options in the past 2-3 years having a targeted mobility routine for our less than ideal home office space and increased screen time is vital to our overhead positioning and pain-free performance. Below are 4 of the best exercises for improving and maintaining your thoracic spine mobility. 

Bench Thoracic and Lat Stretch

Focus on moving through the spine. Utilize box breathing to get the most out of your mobility efforts with this drill. 

Foam Roller Thoracic Extension

To make sure you do this one right the first time, place your feet on box or wall to limit your ability to move in the lower back. 

Banded Wall Slide

Reinforce your new thoracic mobility into your overhead strength. Keep your rib cage down to ensure the movement comes from your shoulders and thoracic mobility versus your lower back. 

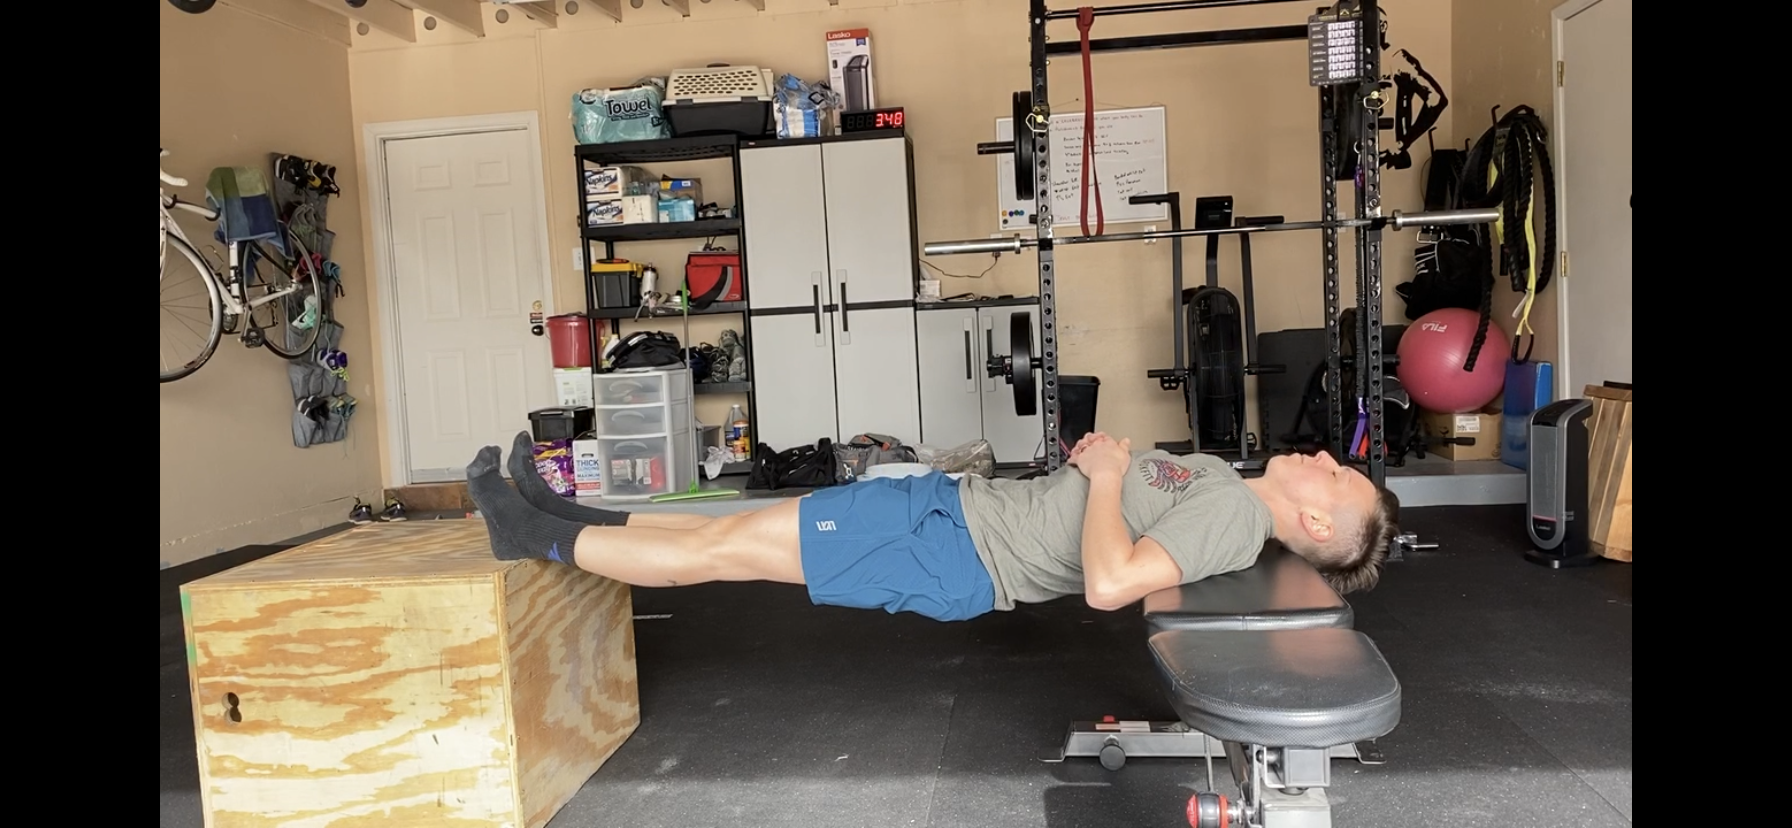
Prone Thoracic Extensions

Potentially the best exercise to emphasize strengthening of the postural muscles for the thoracic spine to help you stack more weight overhead. 

How to use these drills…

Mobility on non-recovery days should only be 5-10 minutes and not limit your exercise session. Performing 1-3 of these drills before a workout is more than enough. Remember the goal of your mobility routine is to improve your performance. It is not the main focus of your performance that day.

Top Tips to stay active when you're experiencing pain.

Exercise of any kind brings with it an inherent risk for aches and pains. Unfortunately, complete injury prevention is a fool’s errand. Injury is the result of a complex systems interaction and can’t always be blamed on poor technique or too much weight on the bar. While you can’t fully prevent all injury, what you do when acute pain is present often dictates how quickly you eliminate that pain and return to full performance. The primary goal of this article is to give you my primary recommendations and strategies to stay active when pain is present including what to avoid and a roadmap to resolving your pain. 

1: Talk to a Coach. 

Your coach is versed in regressions and progressions. They are your front line resource when pain shows up to help you find an appropriate modification while maintaining the stimulus of your training. There are a ton of variables you can change to keep training even in the presence of pain.

2: Get Sweaty. 

Pain can limit you from moving certain loads and maybe you have to remove a movement altogether for a period of time. The options for modifying movement are pretty endless, but my go-to option to do in any situation is to use a piece of cardio equipment to get your heart pumping. You can do 3 limb or even 2 limb conditioning to substitute. Pain can be visualized as a collection of irritants around a specific body part. If I’m having a hard time moving the area because of pain, I can use my central pump (AKA your heart) to get the area flushed with fresh blood and oxygen for healing and pain reduction. Simply substitute the same time or intensity stimulus on a cardio machine you can tolerate (reference #1 to help you determine this) If pain is elevated enough that you feel you can’t participate in class use the following bike routine separate to class, to get your sweat on.

Bike Intervals: 

3 minutes 48-52

2 minutes 52-56

1 minute >56

Rest 1 minute

3. Self management strategies. 

The RICE principle is outdated and debunked. In fact, the original author of RICE has publicly stated that there is no evidence behind RICE and he can’t even recommend it himself.

“Following the release of Reinl’s book, Mirkin publicly recanted his original position on the RICE protocol in a 2015 publication on his personal website (31).  Mirkin even wrote the foreword to Reinl’s second edition of “Iced! The Illusionary Treatment Option”, and offered his revised opinion on the protocol he created;

Subsequent research shows that rest and ice can actually delay recovery.    Mild    movement helps tissue to heal faster, and the application of cold suppresses the immune responses that start and hasten recovery. Icing does help suppress     pain, but athletes are usually far more interested in returning as quickly as possible to the playing field. So, today, RICE is not the preferred treatment for an acute athletic injury (36).”

https://thesportjournal.org/article/the-r-i-c-e-protocol-is-a-myth-a-review-and-recommendations/

This is pretty common in medical literature where treatment strategies have been shown to be ineffective, but remain utilized (IE: early imaging, knee arthroscopy, carpal tunnel surgery, bedrest for low back pain, need I continue…)ARITA should be your new strategy. Active Recovery Is The Answer. Tools like foam rollers, lacrosse balls, voodoo floss, low intensity steady state cardio all have something in common: increased blood flow and input to an injured area. These are all great tools to be used to help reduce pain inputs and allow you to keep training. Importantly, the stimulus you give with any of these tools should be nonthreatening and non-painful. All roads with soft tissue injuries lead to LOADING, and early loading can take the form of isometrics.

Chinese Plank 4x60 seconds

Isometric hold examples:

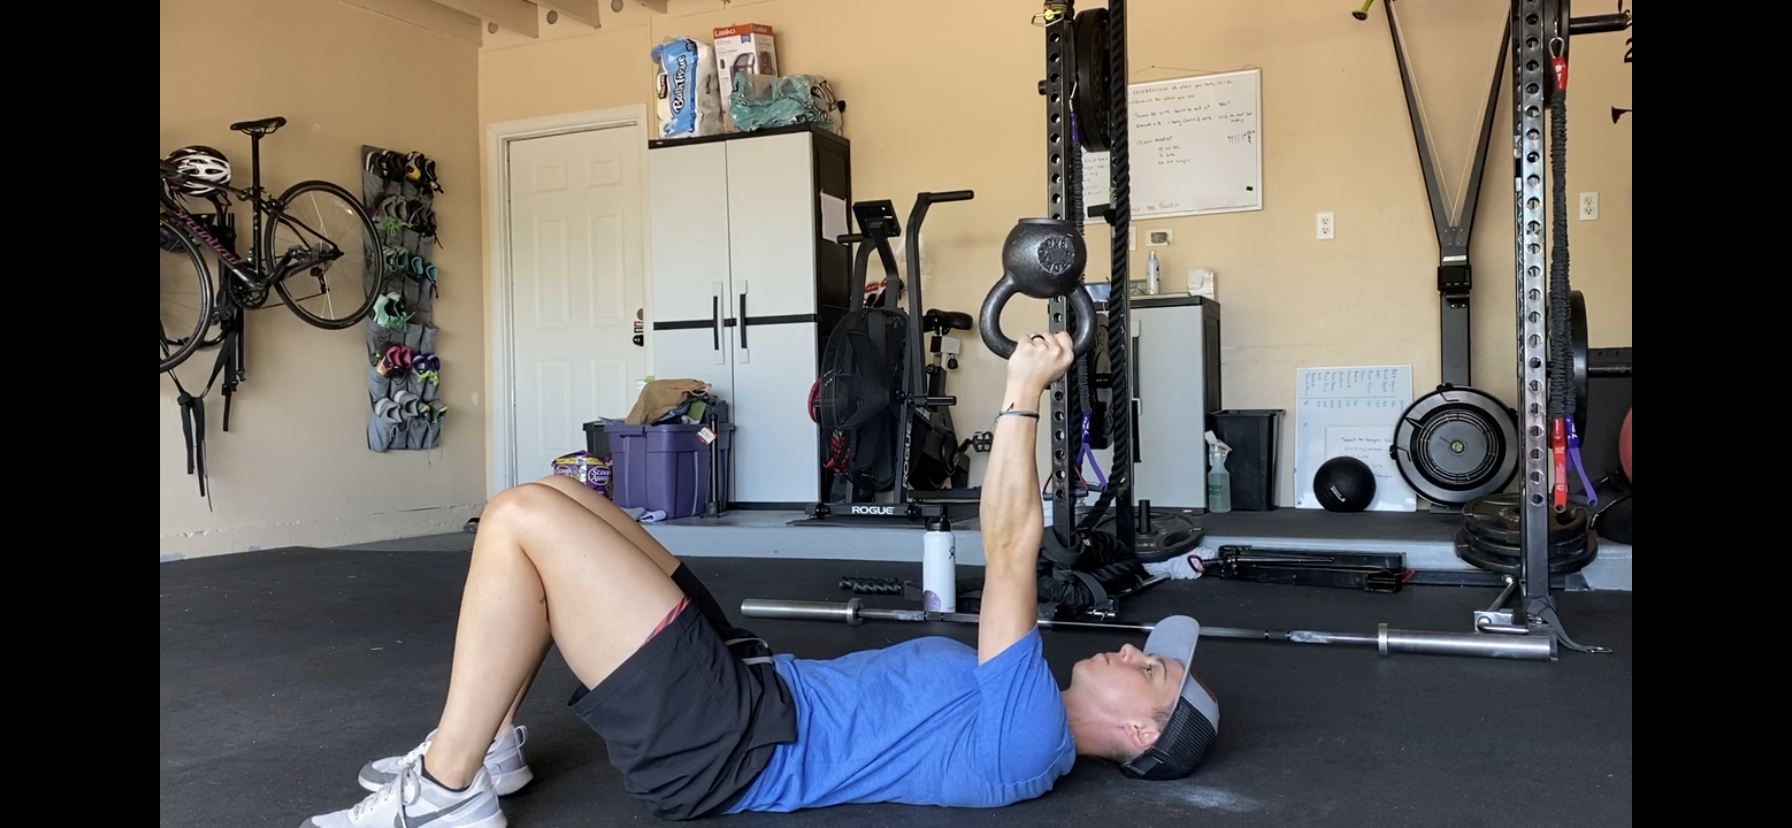
Shoulder pain: bottoms up holds 

Bottoms Up Hold 4x45 seconds

Back pain: Chinese planks 

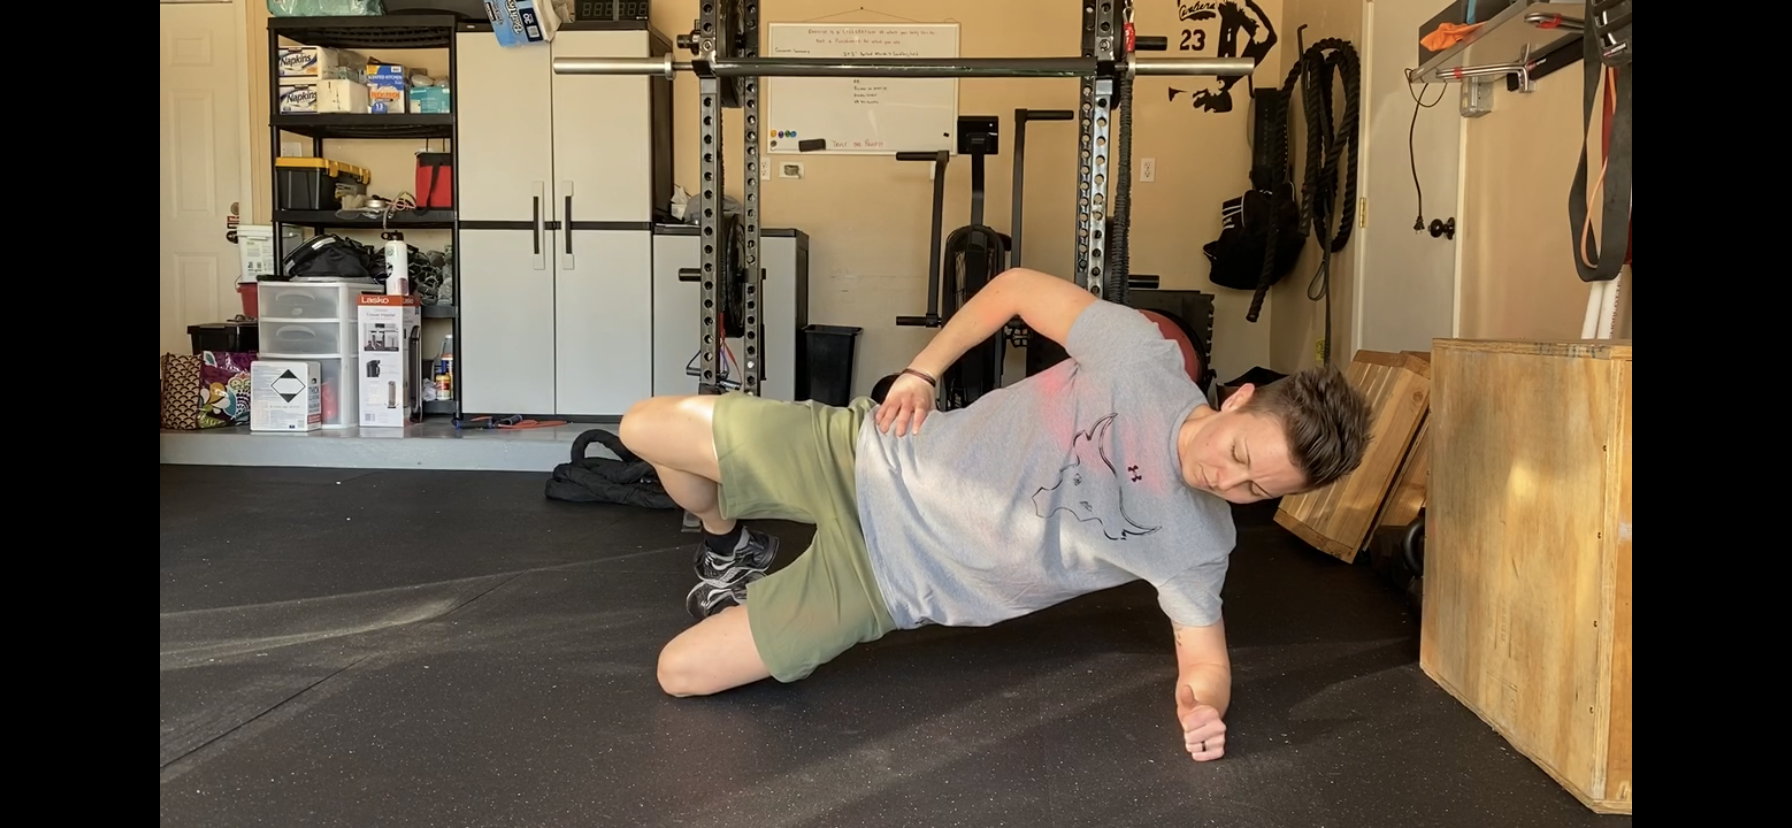
Side Plank 4x45 seconds.

Knee pain: wall sit 

Hip pain: side plank


4. Clean up your Ecosystem. 

No discussion around pain is complete if you aren’t considering your own ecosystem and it’s impact on your pain processing. Pain is a signal that something is off, not always broken, but off. It is not a great time to stay up late, eat processed foods, etc. Your ecosystem includes: stress management, sleep quality and quantity, nutrition, and hydration. Focusing on improving one or all of these areas will help with pain improvement and activity. 

Control what you can control. Do what you can do. One of my biggest hurdles as a physical therapist, is to remind you that there is still a lot of movements you CAN do when pain is present. The worst case scenario is you lose all your fitness and make yourself worse in the process because you’re so busy focused on what you can’t do that you do nothing.

Lastly,

5. Get Evaluated (caveat: by someone who does what you do.) 

The biggest mistake athletes make is to wait and rest. During this time period they get weaker and more frustrated. The second biggest mistake athletes make is getting evaluated by someone who has no idea what a barbell is or why it’s fun (and extremely important) to deadlift, squat, run, bench, press shit overhead, hang on bars, etc. Not only is a healthcare provider who doesn’t do those things unlikely to evaluate your pain specific to your goals, but even worse they are unlikely to load you aggressively enough to get you back stronger.

So if:

  • Pain is worsening 

  • You avoid specific training days 

  • You’re feeling agitated or depressed about your pain

  • Your day to day is impacted (can’t dress without pain, can’t pick up my kids without pain) 

  • Pain went away and came back

It is time to get evaluated and get a focused plan to get back to your activity stronger than before you experienced an injury.

Front Rack Strength for Bigger Cleans

A strong front rack position can be the difference between a missed or completed heavy clean or front squat. Improving your endurance in the front rack can help decrease time with barbell cycling by allowing you to keep a stable shelf and improve Bar path efficiency. While many factors can go into a successful lift let’s assume you have the following:

  1. Full lower body mobility to maintain an upright torso in the bottom of a front squat or clean

  2. Appropriate quad strength to eliminate early hip rise out of the bottom

  3. A good front rack position. If not check HERE for how to improve your front rack position

For many lifters, cleans are won or lost by the dropping of the elbows. Once the elbows drop the efficiency of your leg drive is reduced making your legs functionally weaker. This results in a longer time under the weight of the bar increasing the chances that you’ll miss the lift. Dropped Elbows is the result of a weakness in the thoracic spine extensors. 

These muscles as a group work to keep the chest up and the elbows high. Consistently, the weakest point for most athletes based on muscle size compared to all other primary movers (ie your legs). When the above mentioned assumptions have been met; use the below exercises for accessory strength to help you develop the strength and endurance of these muscles to keep a solid upper back position. 


Squat with Elbow Push Throughs

Use assistance as required at the ankle to achieve your ideal bottom position to allow you to spend increased time working on isolating the upper back muscles. Move in and out of good elbow position to develop improved awareness and endurance for repetitive tasks like thrusters.


Anderson Squat

A favorite of mine because it corrects for so many issues in the front squat/clean. This lift emphasizes your ability to generate raw power out of the bottom of a front squat targeting deficits in the upper back and quads. Really focus on hips and shoulders rising at the same rate.


Supra-Maximal Load Front Rack Iso Holds

Load these up 110-120%. Set the rack at or just below your regular height and stand up. Hold for time to improve pillar strength in the core for upright torso endurance.

 
IMG_1678.JPG
 

Upper Back Extensions

Moving into true hypertrophy training of the upper back with these. You can use a bench as I have or substitute a GHD for more support. Work to move segmentally from the shoulders to the start of the lower back. Keep the lower back flat.


Seated Kettlebell Deadlifts

Again more hypertrophy training for the thoracic extensors. Emphasize a controlled lower to minimize movement at the lower back.


Stop neglecting your upper back strength! Need help getting out of pain in the front rack position or personalized accessory programming to target weak areas? Click below to schedule a free phone consultation to see how I can help you.

Maximize Your Front Rack Position

Full Grip on Bar.png

The front rack position can be a proud position for lifters or one of frustration. Developing a good front rack position improves the efficiency of the front squat, clean, jerk, and thrusters. This can reduce the number of missed lifts and improved barbell cycling, as a result of the elbows dropping and loss of a stable shelf to receive the barbell. 

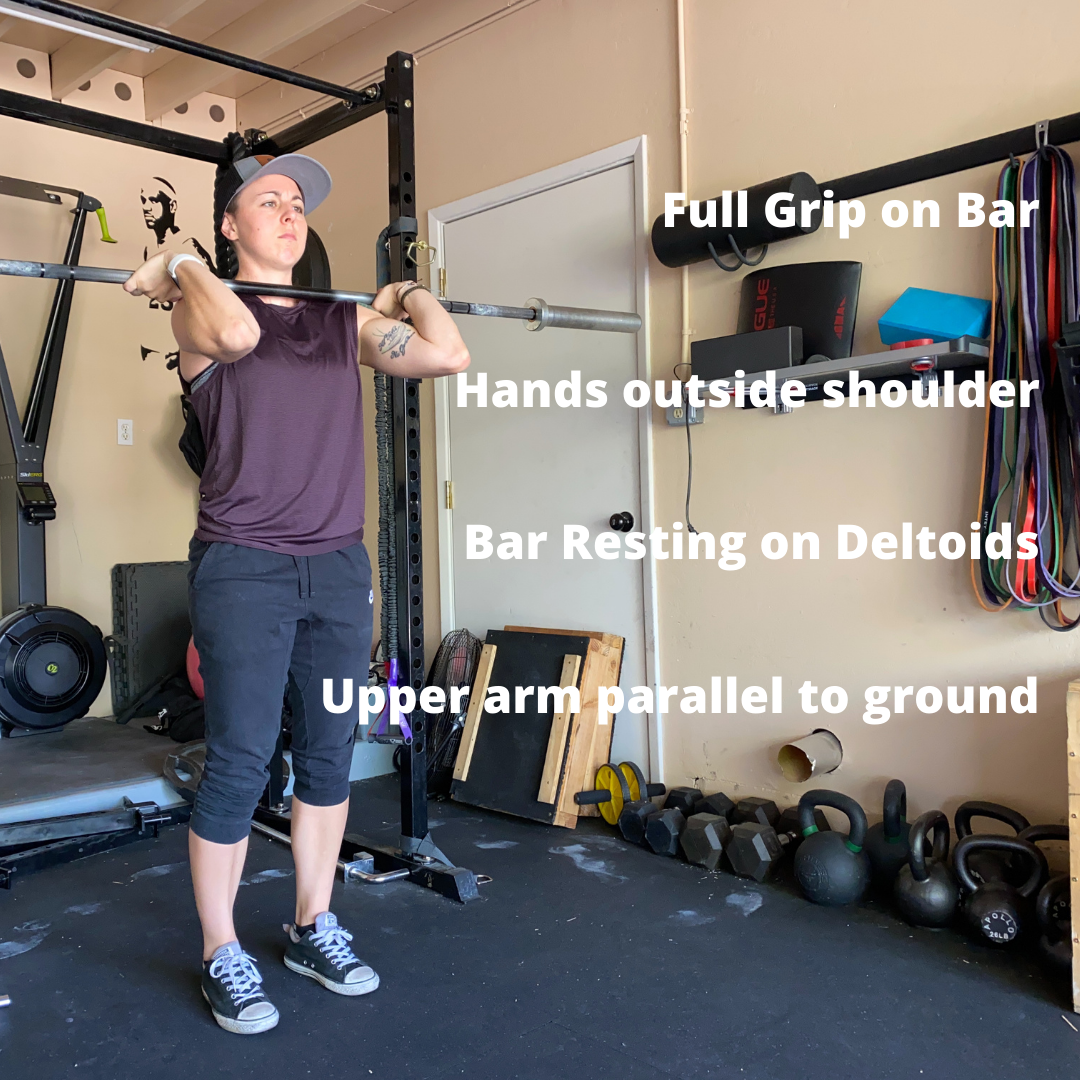
There can be variability in each person’s front rack position but in general the front rack position demonstrates:

  • Full Palm grip on the bar

  • Hands just outside shoulder width

  • Bar resting on deltoids not throat

  • Upper arm parallel to ground

To meet this criteria mobility demands at the wrist, forearm, elbow, shoulder, and thoracic spine are required. Below is a breakdown of the mobility needs at each of these joints and how to address any restrictions. 

Wrist

WRIST EXTENSION.

With your hand fixed to the ground/box with fingers flat. Keep your elbow straight and rock your body forward. Look to see how far past your wrist your shoulder can reach before the heel of your hand lifts from the floor. The shoulder should pass the wrist and the forearm should be just past vertical.

IMG_1566.jpg

WRIST PRONATION

The ability to get your palms facing the correction direction under the bar. Upper arms resting at your sides with elbows bent to 90 degrees. Turn your palms to face the floor keeping your elbows tucked at your side. Palms should comfortably face the floor. 

IMG_1587.JPG

Elbow

ELBOW FLEXION

Arm at shoulder height. Bend the elbow and assess if you can touch your knuckles to the front of your shoulder, using some overpressure if needed. 

Note: if you can’t because of biceps or forearm muscle bulk this is where you will require greater mobility of the shoulder.

IMG_1614.JPG

Shoulder

EXTERNAL ROTATION

Upper arm parallel to the floor and fingertips facing the ceiling. Assess how far you can rotate your forearm. Should be able to achieve at least 5 degrees of external rotation. 

IMG_1602.JPG
IMG_1628.JPG

LAT MOBILITY

Lie on your back with legs out straight and flat on the floor. Reach your arms up overhead and try to reach the floor. Assess if your lower back is already arching high off the floor. To further test the lats, bring your knees up to your chest. If your hands no longer touch the floor, lat restrictions are present. 

IMG_1657.JPG
IMG_1665.JPG

Hitting these mobilizations and achieving those benchmarks will help build comfort and efficiency into your front rack positions.

Need more specific mobility programming? Contact us for a personalized prescription!

How to Deadlift with Low Back Pain

Deadlifts are a top shelf exercise. Arguably the most “functional” lift performed on a regular basis due to the similarities in bending and lifting for everyday tasks like picking up your kids, moving boxes or furniture; it has a place in every person’s exercise program. 

Returning to a pain-free deadlift from the floor is a HUGE milestone for athletes returning from injury.

But what should you do when you’re not pain-free or don’t feel confident pulling from the floor? Instead of avoiding the deadlift all together we should scale it to where it’s challenging but non-aggravating. This strategy allows you to still train the pattern and the muscles while building the strength to return to pain-free deadlifting.

Below is a list of progressions and variations I use to modify the deadlift for pain-free performance until athletes are ready and able to pull from the floor.

Hip Thrusts. A great way to load your posterior chain while challenging your ability to control movement at the spine. 

Kettlebell Deadlifts. Reducing possible fear and anxiety associated with barbell deadlifts while increasing freedom of movement at the knees, the kettle bell is an underutilized deadlift modification. 

IMG_1232.jpg

Rack Pulls or Elevated Deadlifts. BRING THE GROUND UP. Reducing the range of motion of the deadlift is one of my go to modification. Rarely do I have to eliminate deadlifts from a program. With proper cues to achieve spinal stiffness and appropriate bar bath an athlete can often times deadlift in a modified range without pain. If you don’t have access to lifter arms, simply place 45# plates under the barbell. This modification can be applied to any deadlift variation you choose.

Sumo Deadlift. With a wider stance and a more upright trunk position, this variation blends the demands of a deadlift with a squat. This reduces the amount of demand on the lower back and increases the load on the quads.

IMG_4587.JPG
IMG_9563.JPG

The deadlift is an important foundational movement. King at strength development for the posterior chain and lower back, but importantly it demands strength and resilience for bending and lifting tasks performed in our everyday lives. Lower back pain can limit your tolerance to conventional deadlifting, but these provided modifications should allow you to train the fundamental movement pattern: the hinge, while you restore pain-free movement to your deadlift.

Ready to restore your deadlift and resolve low back pain? Set up a phone consultation or schedule your initial evaluation with us to get started ASAP.

Top Rehab Exercises to Strengthen Your Lower Back

If you’ve been alive for the past 30 years, you’ve heard that the solution to low back pain is core strengthening. I even spent an entire semester in PT school learning about core strengthening. But when I started practicing I realized a huge hole in low back rehab. The lower back muscles need strengthening after injury just like everywhere else in the body. It would be insane to have a rotator cuff injury and not do rotator cuff strengthening…yet direct lower back strength is often lacking in rehab programs.

The deadlift gets a bad rep when it comes to low back injury, however it is king when it comes to lower back strengthening. But sometimes the body needs a break from deadlifting. Whether you’re experiencing low back pain or looking for exercises to use to improve your lower back strength, below are my current favorite exercises to strengthen the lower back directly and build resilience to heavier and repetitive loading

.

Chinese Plank. With no movement occurring at the spine or hips this is a great entry level isometric exercise to increase endurance and promote functional stiffness of the lower back. Add a weight across your pelvis for an added challenge.

Reverse Hyper Holds. A progression to supporting more of your bodyweight. No need to extend the lower back when performing because we want to work on minimizing movement at the spine and create stiffness to prevent pain. 

GHD holds. Make sure you’re squeezing your gluten and keeping your torso parallel to the floor. Work up to at least 2 minute holds.

IMG_1231.jpg

Bent Over Rows. Progressing your movement into the midrange hinge pattern where position of the spine is often lost by athletes to reinforce spinal stiffness and endurance for high volume deadlifting. You can vary whether you use kettle bells, dumbbells, a barbell, or even band resistance.  

Banded Goodmorning. Reintroducing the full motion with band resistance will help to reinforce appropriate movement quality for a better bar path when returning to the barbell. 

Having a strong core is an important part of low back pain management.

Having a strong back is an important part of low back pain management.

Struggling with low back pain?

Send us an email: abigailbird@warriorrxtucson.com to get started on your low back rehab.

Lower Back Strength for the Deadlift

Deadlifts are one of the best exercises for lower back pain rehabilitation.

Deadlifts are one of the most blamed exercises for causing lower back pain.

How can this be?

While the mobility demands of the deadlift are minimal, the lower back strength demands are high.

The deadlift is based around a hip hinge pattern meaning the knees are relatively straight as you push the hips back with a flat back resulting in an inclined torso position. Well, as you hinge forward the load on the lower back increases. When performed with proper technique the deadlift enhances spinal stiffness and strength making it more resilient.

Here are 2 baseline tests to assess your lower back strength and mobility for the deadlift.

IMG_1231.jpg

Biering-Sorenson Test. Set your GHD such that the front of your hips/pelvis are resting on the pads. Arms across the chest and hold yourself horizontal for as long as possible. 

Good Lower Back Strength: > 2 minutes

Active Straight Leg Raise. Lie on your back with your back flat to the floor and legs straight out in front of you. Keeping the knee straight lift one leg while keeping the other flat.

Good Hamstring mobility: > 80 degrees from the floor.

Didn’t pass these tests? This doesn’t mean you shouldn’t be deadlifting, but it may cue you in to some areas for improvement to optimize your set up and pulling performance, while minimizing your injury risk.

Pain with these tests? Pain with deadlifts? Want to optimize your deadlifting efficiency? Contact us to get started!

How to Guide: The First 6 weeks of Post-Operative Rehab

a00408f02.jpg

In March this year, I suffered a 90% proximal hamstring tear while sumo deadlifting in my garage gym. The majority of my hamstrings were detached and floating in my thigh a couple of inches down from my sit bones with the ability to do nothing. The worst thing about the injury: it happened with a lift I’ve never had trouble with, I’d never had hamstring pain before, and it happened on a day when I was feeling amazing on all my earlier lifts. In an instant, my whole world and self-view was turned inside out. My identity as a crossfit athlete and as a physical therapist was demolished. As an athlete,I could no longer run or lift heavy. I was trying to rehab myself, but nothing was improving. Still, I kept pushing because that's what we do, we go until we can’t. I was modifying and rehabbing, but everything was off. I replayed that lift in my head over and over again wondering about all the things that could never change my current situation.

After six weeks of rehab, an MRI, and countless conversations with clinicians who are also crossfit athletes, I made the decision to undergo surgical repair, amidst covid-19 and job security stressors. As a physical therapist, rarely do I consider surgery an option. Regardless of the quality of your rehab and the commitment you make to it; some injuries require a surgical intervention to return to higher level activities. I was still able to box squat 200 pounds, but I couldn’t walk more than 100 yards without feeling unstable. Each case is different and it’s important that you and your team have honest conversations about your function. Utilize research to determine surgery is indicated to make an informed decision about your care. Specifically in the case of a torn hamstring, outcomes drastically decrease after 6-8 weeks due to the level of scarring that can occur around the sciatic nerve and atrophy that takes place. If I never wanted to run or jump again I could have avoided surgery, but that did not align with my goals. Again, your intervention needs to match your goals.  

Warrior Rx Tip: Consult with people who understand your goals and your fitness community. If you’re getting advice from a physician or clinician who has no idea what your goals are or who has negative beliefs around your sport you may not be getting all the information or full expectations for your road to recovery. 

Surgery was only 2 hours. It required me to be under anesthesia and on my stomach. The surgeon made an incision just below my sit bones and carefully located my detached hamstring tendons. She then pulled them back up to where they should be and sutured them to the bone. 

My postoperative restrictions were pretty significant. I had 6 weeks of non-weight bearing crutch use, 24/7 use of a knee immobilizer so I wouldn’t straighten my knee, and no sitting upright. Not to mention the surgical site was right where nobody would want it making it feel like I had a tennis ball under one hip at all times. I couldn’t sit on the toilet comfortably, bathe or dress myself, drive, sit upright to eat, sit for more than 10 minutes, or stand for long periods of time. To say I didn’t know who I was would be accurate. 

Over these first six weeks, my emotional and physical self were tested. I didn’t feel like myself most of the time. I had to constantly fight thoughts that I would never get back to who I was in the gym, never achieve my goals.

Now, I’m not trying to downplay how difficult the recovery process will be for each athlete, but if you’re finding yourself in this mental place due to injury, here’s what I’ve learned from my experience. Hopefully a few of these will resonate with you and keep your head on straight. 

Trust the process. My protocol for the first 2 weeks did not allow for any physical therapy or time out of the brace besides assisted showering. The next 4 weeks let me perform heel slides, ankle pumps, and squeezing of my quads. As I looked over that 6 week protocol, the athlete in me doubted it. I thought, “obviously she doesn’t know what I’m capable of,” or “this is holding me back.” But as a physical therapist, I knew to respect those first 6 weeks. Whether you're post-surgical or just in a lot of pain, acknowledge that you may need some help...and you may need help holding yourself back . Even as a physical therapist focused in the crossfit space, I knew to collaborate for my own rehab. Specifically in tendon repairs, you need to respect your physiology. It does take that long for the repair to ensure you don’t have chronic weakness. You can’t see your own blind spots. Those early weeks of rehab are challenging, I get it. It doesn’t feel like you’re doing a whole lot, but it’s a building block phase. So find a physical therapist you trust who understands what you need to give you guidance.
IMG_4831.jpg

Stay in the gym. Training your uninjured side is extremely valuable. Crossover-education strength gains have been well documented, and allow you to preserve strength in your injured limb even when you are unable to use it. Truthfully, my left (uninjured) leg became a monster, which will help me greatly in the later phases. 

Exercises to train your uninjured side:

For a hamstring recovery, this looked like awkward looking seated hamstring curls. 

For an achilles, loaded single leg heel raises. 

For a shoulder, dumbbell or kettlebell work. 

For all: 3 limb conditioning on the assault bike or rower. 

Honestly, a lot of days I didn’t want to train. It was easy to think it wasn’t worth it because it was just a reminder of what I couldn’t do and who I wasn’t anymore. But with planning and some creativity, it was the only time I felt like myself. This brings us to number 3.

IMG_1055.PNG

Set a goal for something you normally would blow off. We all have our limiting skills and weaknesses that cause us to scale specific workouts. When you’re injured, it’s easy to only see what you’re losing. But setting a focus to progress a specific skill is a great way to combat your negative thought patterns. For me, skills and strength above the rings were my focus. Since I couldn’t use my legs, it was a great time to develop strength for strict dips and pull ups to address my specific weaknesses in the muscle up. It was a time in training where I didn’t have to acknowledge my injury. If you can’t come up with any ideas within your restrictions, ask a coach or shoot me an e-mail and I’d be happy to help you troubleshoot that.

Your spirit as an athlete will not die. Your love for the hard work and the grind through skills will stay with you. My rehab has only reinforced my mental toughness and focus. After I lost my identity as a crossfit athlete, I started to actually notice the movements and all the skill and strength required. The grit. The drive. My appreciation and gratitude for how I was able to work through them grew exponentially. As I gain the ability to work hard again, I appreciate my successes more, I push myself more because I want that feeling of breathlessness back. I can acknowledge my capabilities easier, and not put my head down when I cannot do something.

Screen Shot 2020-07-23 at 11.18.14 AM.png

Lastly, your community won’t abandon you. This is perhaps the most important and most encouraging point. It is likely that you may not be able to see your own progress, but your community will. Anyone who trains in a group setting has a hidden advantage. In basketball it’s called the sixth man. Your community will be your greatest cheerleader.

Screen Shot 2020-07-23 at 12.01.26 PM.png

Each recovery process begins with acknowledging where you are and then setting progressive goals to achieve a much larger goal. This process is easier when you’re working with individuals who understand not just your injury, but the demands of your sport. If you’ve undergone rehab, but feel like it left you plateaued in specific skills or lifts, or you’re just starting the rehab process after surgery email me at: abigailbird@warriorrxtucson.com or direct message me on instagram  @warriorrxtucson. I’d be happy to talk with you about your specific situation to get you back to achieving your goals.